How To Change A Dirt Bike Tube? Step-by-Step Guide

If you’re an avid dirt bike rider, then you know that a flat tire is just part of the game. But don’t worry, changing a dirt bike tube doesn’t have to be a daunting task. In this blog post, we’ll walk you through the step-by-step process of how to easily change a dirt bike tube.
From removing the tire to installing the new tube, we’ll cover all the tips and tricks you need to know to get back on the trails in no time. So grab your tools and let’s get started!
How To Change A Dirt Bike Tube?
To change a dirt bike tube, follow these steps: remove the wheel, release the air from the tube, pry off one side of the tire bead, pull out the old tube, insert the new tube, push one side of the tire bead back onto the rim, inflate the tube, and check for any leaks. Changing a dirt bike tube involves a systematic process that ensures proper installation and function.
Step-by-Step Guide:
- Remove the Wheel:
- Loosen and remove the wheel from the dirt bike.
- Deflate the Tire:
- Use a valve stem tool to release all air from the tire.
- Remove the Tire:
- Use tire levers to take one side of the tire off the rim.
- Replace the Tube:
- Take out the old tube and insert the new one, aligning the valve stem.
- Mount the Tire:
- Use tire levers to put the tire back on the rim. Be cautious not to pinch the tube.
- Inflate and Check:
- Inflate the tire partially, ensuring proper bead seating. Then fully inflate and check for leaks.
- Reinstall the Wheel:
- Put the wheel back on the dirt bike and secure it.
- Final Check:
- Double-check tire pressure and overall installation.
Always refer to your bike’s manual for specific instructions, and if uncertain, seek professional help.
Tools And Materials
Changing a dirt bike tube may seem like a daunting task, but with the right tools and materials, it can be a straightforward process. Whether you’re a seasoned rider or a beginner, having the necessary equipment and components is essential for a successful tube change.
In this section, we’ll discuss the essential tools needed and recommended materials to make your tube change as smooth as possible.
Essential Tools Needed For Changing A Dirt Bike Tube:
- Tire levers: These handy tools help you remove the tire from the rim without damaging the tube or the tire itself. Make sure to have at least two sturdy tire levers to provide enough leverage during the process.
- Valve core remover: When changing the tube, it’s crucial to remove the valve core to deflate the tire fully. A valve core remover simplifies this step and allows you to release all the air quickly.
- Patch kit: Accidents happen, and having a patch kit on hand can save you from the hassle of replacing a tube altogether. Patch kits typically include sandpaper, adhesive patches, and an instruction manual to help you fix small punctures.
- Pump or co2 inflator: Once you’ve successfully changed the tube, you’ll need to inflate it to the recommended tire pressure. A reliable pump or co2 inflator can make this task a breeze.
- Lubricant: Applying a bit of lubricant to the tire bead before reassembling can make it easier to mount the tire onto the rim. Be sure to choose a lubricant suitable for tires and rims to prevent damage.
Recommended Materials For A Successful Tube Change:
- Spare tube: Carrying a spare tube with you is always a smart idea, especially on longer rides or in remote locations. It allows you to quickly replace a damaged tube and get back on the trail.
- Tire irons: While not essential, tire irons can provide additional leverage and make the process of removing and installing the tire easier. Having a set in your tool kit can come in handy, particularly for stubborn tires.
- Tube talc or baby powder: Dusting the inside of the tire with tube talc or baby powder helps reduce friction between the tube and the tire. This can minimize the risk of pinch flats and make it easier to insert the tube into the casing.
- Safety goggles or glasses: When working with tire levers or other tools, there’s always a chance of accidents or projectiles. Wearing safety goggles or glasses protects your eyes and ensures a safe working environment.
- Portable tire pump: If you’re out on the trails or far from a gas station with an air pump, a portable tire pump can be a lifesaver. Look for a compact pump that’s easy to carry and offers a decent inflation rate.
By being prepared with these essential tools and recommended materials, you’ll have everything you need for a successful dirt bike tube change. Now let’s dive into the step-by-step process of how to change a dirt bike tube!
Step 1: Preparing The Bike
Before you can change the dirt bike tube, it’s essential to prepare the bike for the process. This step ensures stability and makes the subsequent tasks easier. Here’s what you need to do:
- ### elevating the bike to ensure stability
- Place the bike on a sturdy stand or lift to ensure it stays balanced and steady throughout.
- Make sure the stand or lift securely holds the bike in an upright position.
- Avoid any unstable or wobbly surfaces that may compromise the bike’s balance.
- ### deflating the tire and removing the wheel
- Before removing the wheel, deflate the tire completely. You can do this by using a valve cap remover to loosen the valve core and let the air escape.
- Once the tire is fully deflated, use a tire lever to carefully remove the tire from the rim. Be gentle to avoid damaging the wheel or tube.
- If the tire is stubborn, apply a little soapy water or use a bead breaker to help loosen it from the rim.
Remember, taking these preliminary steps will set you up for success when it comes to changing the dirt bike tube. By elevating the bike securely and deflating the tire, you’ll ensure stability and make the wheel removal process much smoother.
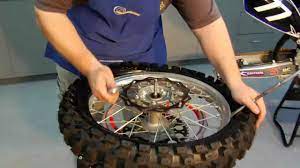
Step 2: Removing The Old Tube
Loosening The Valve Nut And Releasing Any Remaining Air
Before you can remove the old tube from your dirt bike tire, you’ll need to take a couple of important steps. First, you’ll want to loosen the valve nut to ensure a smooth removal process. Simply use a valve tool or small wrench to loosen the nut counterclockwise.
This will help release any remaining air in the tube, making it easier to work with.
Once the valve nut is loosened and the air is released, it’s time to move on to removing the tire from the rim. This step is crucial in gaining access to the tube and ultimately replacing it. Follow these steps to safely and effectively remove the tire:
- Start by standing the tire upright and placing it on a stable surface. This will make it easier to work with.
- Use a tire lever to pry the edge of the tire away from the rim. Insert the lever between the tire and rim, then apply pressure to lift the tire off the rim. Work your way around the entire tire, gradually prying it off the rim.
- Take caution while using the tire lever, as excessive force can damage the tire or rim. Be gentle and patient throughout the process to avoid any unnecessary complications.
- Once the first side of the tire is lifted off the rim, repeat the process on the opposite side. Insert the tire lever between the tire and rim, then carefully pry the tire off. Again, work your way around the tire until it is completely removed from the rim.
- With the tire removed, you can now access the old tube inside. Take a moment to inspect the tube for any obvious signs of damage or wear. This will help determine if a replacement is necessary.
- Carefully pull the old tube out from between the tire and rim. Be cautious not to snag or tear the tube as you remove it. Set the old tube aside for disposal or further inspection if needed.
By following these steps, you can effectively remove the old tube from your dirt bike tire. Once the tube is out, you’ll be ready to move on to the next steps in the process of changing a dirt bike tube.
Step 3: Inspecting The Tube And Rim
Checking For Any Punctures Or Damage On The Old Tube:
Inspecting the tube of your dirt bike is an essential step in changing it. By carefully examining the old tube, you can identify any punctures or damage that may have caused the flat tire. Here’s what you need to do:
- Carefully remove the old tube from the tire, ensuring not to damage it further.
- Inflate the tube slightly to make it easier to inspect.
- Run your hand along the entire length of the tube, feeling for any signs of punctures or cuts. Pay close attention to the areas near the valve stem and the tire sidewalls.
- Look for any visible signs of damage, such as holes or tears. If you find any, it’s crucial to replace the tube rather than attempting to patch it.
It’s essential to carry out a thorough inspection of the old tube to ensure that you don’t encounter the same problem again. By identifying and addressing the cause of the puncture or damage, you can increase the longevity of your new tube and enjoy a smoother ride.
Examining The Rim For Debris Or Sharp Objects That May Have Caused The Puncture:
Alongside checking the tube, you must also inspect the rim for any debris or sharp objects that could have caused the puncture. Follow these steps to examine the rim thoroughly:
- Remove the tire from the rim to access the inner section.
- Clean the rim’s surface using a rag to remove any dirt or debris.
- Run your fingers across the rim’s inner surface, feeling for any rough spots or sharp edges. These could have punctured the tube during your ride.
- Shine a flashlight into the rim, carefully checking for any hidden objects like glass shards, nails, or thorns.
- If you discover any debris or sharp objects, remove them using pliers or a similar tool. Ensure that the rim is clean and smooth before installing the new tube.
By inspecting the rim for any potential causes of puncture, you can prevent recurring issues and maintain optimal performance of your dirt bike. Taking the time to thoroughly examine both the tube and the rim will set a solid foundation for successfully changing the dirt bike tube and getting back on the trails in no time.
Step 4: Choosing The Right Replacement Tube
Riding a dirt bike can be an exhilarating experience, but dealing with a flat tire can quickly put a damper on your adventure. Understanding how to change a dirt bike tube is an essential skill that every rider should possess.
In this step-by-step guide, we will walk you through the process of replacing a dirt bike tube, ensuring you can get back on the trails in no time. So let’s dive into step 4: choosing the right replacement tube.
Understanding The Different Types And Sizes Of Dirt Bike Tubes Available
When it comes to choosing a replacement tube for your dirt bike, there are a few factors to consider. Here are the key points to keep in mind:
- Different types: Dirt bike tubes come in different materials, such as butyl rubber or heavy-duty synthetic rubber. Each type has its own set of pros and cons, so understanding your needs and riding style will help you make an informed choice.
- Sizes: It’s crucial to select a tube that matches the tire size of your dirt bike. Tubes are available in various sizes, indicated by numbers on the side of the tube that correspond to tire measurements. Make sure to reference these numbers when purchasing a replacement tube.
Selecting A Tube That Matches The Bike’S Specifications And Riding Conditions
To ensure a proper fit and optimal performance, it’s essential to select a tube that matches your bike’s specifications and riding conditions. Consider the following when choosing the right replacement tube:
- Bike specifications: Consult your dirt bike’s manual or the manufacturer’s website to determine the recommended tube size and type for your specific make and model. This information will help you choose a tube that is compatible with your bike.
- Riding conditions: The terrain and conditions you typically ride in will also influence the type of tube you should choose. If you frequently ride on rough or rocky terrain, a heavy-duty tube may be ideal for added protection against punctures.
By understanding the different types and sizes of dirt bike tubes and considering your bike’s specifications and riding conditions, you can confidently select a replacement tube that will keep you going on your off-road adventures. Remember, choosing the right tube is crucial to ensure a safe and enjoyable ride, so take the time to find the perfect match for your dirt bike.
Now let’s move on to step 5: preparing for tube replacement.
Step 5: Installing The New Tube
Now that you’ve removed the old tube and inspected the tire for any obstructions, it’s time to install the new tube. Follow these steps to ensure a smooth and successful installation:
Inserting The Valve Into The Rim Hole And Securing It With The Valve Nut
- First, locate the valve hole on the rim and align it with the valve stem of the new tube.
- Push the valve stem through the rim hole carefully, ensuring that it goes all the way through.
- Once the valve is inserted, secure it in place by tightening the valve nut. This will prevent any air leakage during your ride.
Carefully Aligning The Tube Inside The Tire And Mounting The Tire Back Onto The Rim
- Begin by placing the new tube inside the tire, making sure it is evenly distributed and not twisted or pinched.
- Pay close attention to aligning the valve stem with the hole in the rim.
- With the tube in place, start mounting the tire back onto the rim, starting from one side and working your way around.
- Use your hands to push the tire onto the rim, moving in small increments to avoid any chance of pinching the tube.
Remember, it’s essential to be cautious and take your time during this step to ensure everything is properly aligned and installed. Once the tire is fully mounted on the rim, you can move on to the final step of inflating the tube to the recommended pressure.
Following these guidelines will help you change your dirt bike tube efficiently, ensuring a safer and smoother riding experience.
Step 6: Inflating The Tire And Finishing Touches
Now that you have successfully replaced the dirt bike tube, it’s time to inflate the tire and add those final touches to ensure a smooth ride. Follow these steps to complete the process:
Gradually Inflating The Tire, Ensuring Proper Alignment And Pressure:
- Start by attaching the air pump to the valve and securing it tightly.
- Begin inflating the tire gradually, monitoring the pressure as you go.
- Check the manufacturer’s specifications or your owner’s manual to determine the recommended tire pressure for your dirt bike.
- It’s important to inflate the tire evenly, so keep a close eye on its alignment as you pump in the air.
- Avoid over-inflating the tire, as this can cause it to burst or affect its performance.
Checking For Any Air Leaks And Adjusting As Necessary:
- Once the tire is fully inflated, inspect it carefully for any signs of air leaks.
- Listen for any hissing sounds or feel for air escaping using your hand.
- If you detect a leak, release the air and recheck the tube to identify the source.
- Patch any holes with a tire patch kit or replace the tube if necessary.
- Double-check the tire’s alignment and pressure after the repair to ensure optimal performance.
Reattaching The Wheel To The Bike And Testing The Tire’S Functionality:
- Slide the wheel back onto the axle, making sure it aligns properly with the brake caliper and chain.
- Tighten the axle nut securely but avoid overtightening.
- Spin the wheel to check if it rotates smoothly without any obstructions.
- Test the functionality of the tire by gently bouncing the bike up and down to ensure it remains firm and balanced.
- Take a short test ride to assess the tire’s performance before embarking on longer rides.
By carefully following these steps and paying attention to detail, you’ll be able to change a dirt bike tube with confidence. Remember to prioritize safety and regular maintenance to keep your dirt bike in optimal condition for all your off-roading adventures.
Frequently Asked Questions Of How To Change A Dirt Bike Tube
How Do I Know If My Dirt Bike Tube Needs To Be Changed?
If you notice frequent punctures, air leaks, or bulges, it’s a sign that your dirt bike tube needs replacement.
What Tools Do I Need To Change A Dirt Bike Tube?
To change a dirt bike tube, you’ll need tire levers, a valve core tool, and a new tube.
Can I Change A Dirt Bike Tube By Myself?
Yes, you can change a dirt bike tube by yourself by following a step-by-step guide and using the right tools.
How Long Does It Take To Change A Dirt Bike Tube?
On average, it takes about 20-30 minutes to change a dirt bike tube, depending on your experience.
Are There Any Tips To Prevent Dirt Bike Tube Damage?
To prevent dirt bike tube damage, it’s essential to maintain proper tire pressure, avoid riding on sharp objects, and replace old tubes regularly.
Conclusion
To wrap up, changing a dirt bike tube may seem like a daunting task, but with the right guidance and tools, it can be a straightforward process. By following the step-by-step instructions provided in this blog post, you can easily replace a damaged tube and get back on the trail in no time.
Remember, safety should always be your top priority, so take the time to inspect your tires regularly and invest in high-quality replacement tubes. With practice, you’ll become more confident in your ability to change a dirt bike tube efficiently. Plus, by mastering this essential skill, you’ll save money on mechanic fees and be able to handle unexpected flat tires with ease.
So, don’t hesitate to get your hands dirty and take control of your dirt bike maintenance – you’ll be rewarded with smoother rides and more enjoyable adventures!